If you want to create or update your own website, one of the first things you’ll need to know how to do is upload files to your server.
The good news is that it’s pretty simple to do, and once you’re all set up it won’t be significantly different than moving files around on your own computer.
What is FTP?
FTP stands for “File Transfer Protocol”, and it’s the name of the basic method of transferring files from your computer to your server (a.k.a. your website hosting account).
Sound difficult? It’s not, really. When you view a web page in a browser, you’re already using HTTP (ex. http:// or Hyper Text Transfer Protocol), and when you move files to the server you’re using FTP.
How to Use FTP to Transfer Files
To start transferring files to your server, you’ll need two things:
- A web hosting account
- A file transfer (FTP) program
Getting a hosting account for your website
You probably already have a hosting account, but if not, you can register one at a website hosting provider like Host Gator for a few bucks a month.
When you register, you’ll likely choose a domain name, and the host will typically handle the process of linking up the domain name with your server (hosting account) for you.
When you complete your registration, you’ll likely be able to view your default website pages at http://www.yourwebsitename.com.
Getting an FTP Program
An FTP program is a simple utility you’ll install on your computer that will provide you an interface in which you can see the files on your computer in one window pane and the files on your server in another. There are a number of quality free and premium FTP programs out there.
One of the most popular and reliable FTP programs is FileZilla. If you don’t have a specific reason to do otherwise, you should probably just grab a free copy of FileZilla and install it on your computer to get started.
Connecting to Your Server
Once you have a hosting account and have installed your FTP program, you’re ready to get started! Go ahead and launch your FTP program, and let’s connect to your server.
The credentials you’ll need to connect to your server
There are a few basic credentials you’ll need to know to connect to your server. When you registered your hosting account, they probably e-mailed these to you in your intro letter. If not, just log in to your hosting account and navigate to the “FTP” area — you’ll be able to create an FTP user and should be able to see the host name and/or port information.
- Host: In the majority of setups the host name you need to use to connect to your server if simply ftp.yourwebsitename.com. If you’re unsure of your host name, give this a try. If it doesn’t work, log in to your hosting account and double check the host name in the “FTP” section.
- User: The username you created when you registered your account should work, but if not, log in to your hosting account and create a new FTP user.
- Pass: The password you created when you made your hosting account, or the password you specified when creating an FTP user.
- Port: This can usually be left blank and it will work fine. If your host requires a specific port, it should tell you so when you’re in the FTP area of the host’s website.
Entering your login info into your FTP program
If you’ve fired up your FTP program, you probably see empty fields for “host”, “username” and “password”. Go ahead and enter the info you collected from your hosting provider into these fields.

If you don’t know your host, username or password, log into your hosting account and navigate the FTP section of the website. You should be able to create a user and see the host name you need to use.
Once you’ve entered your info, click the connect button. If you have the correct host, user and pass, you should see some info stream atop the screen followed by a list of the files and folders on the server on your screen. If you were unable to connect, log into your hosting account and make sure you’re using the correct login info.
Uploading Files to Your Website
Now that you’re connected to your server, you can begin uploading files. If you’re using FileZilla (and probably even if you’re not), you should see a list of the files and folders on your computer in the left half of your screen, and the list of the same from the server on your right.
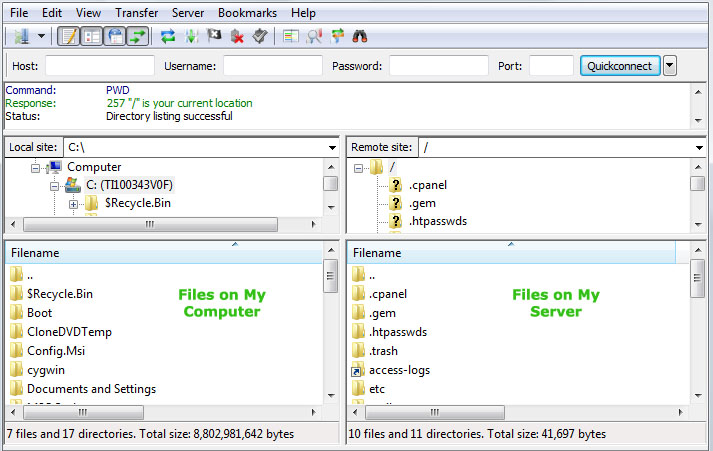
First, find the file on your computer
To upload a file to your website server, simply navigate to the file on the “your computer” side of the screen. You should see all of the files and folders on your computer, and should be able to find any files that exists on your hard drive in the same place you’d normally find it.
Next, make sure you’re in the right server directory
Hosting accounts differ in what folder appears when you first log in. To upload files correctly, you’ll want to make sure you’re in the right folder on the host server.
You’ll probably start by uploading files to the root public html file, which is where the server checks for files when the website loads. On some hosting accounts this folder is called “public_html” and on others it’s called “www” or something else. Some hosts deliver you directly to this place when you first log in, in which case you need to do nothing.
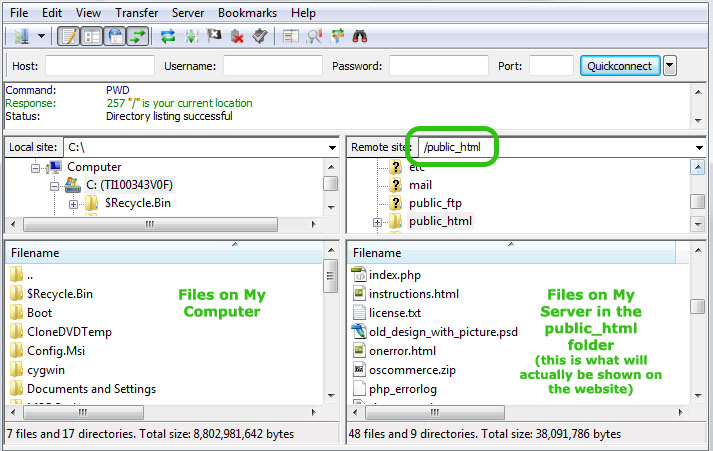
When you have the file you want to upload on the left, and you’re in the correct folder on the right, you can now upload your file! Just drag it over, or right-click it and select Upload. Done correctly, if you’ve uploaded a file named “contact.html” to your server, you should now able able to see it at http://www.yourwebsitename.com/contact.html.
Troubleshooting File Uploading
If you’re unable to connect to your server, log into your hosting account and find the “FTP” section of the admin. Double-check your username and password (or create a user if one doesn’t already exist) and find the host name and port number, if specified.
If you can connect to the server but your files aren’t showing up when you view your site in a browser, make sure you’re uploading your files to the correct directory on the server. You may need to check with your host to see where files are supposed to be uploaded, or you can also browse through the folders until you find the default “index.html” file.
If you’re still having trouble, contact your hosting provider and they should be able to help you get up and running.
 Zachary Coyne is a freelance website designer and developer in Tucson, Arizona. Zach has been designing, developing, fixing and updating websites for the better part of a decade. He enjoys helping people learn how to fix and update their websites, and offers one on one